 |
KYUHONME TSUKIKAGE
SITUATION AND INTENTION
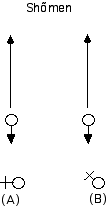
Sitting in Seiza facing diagonal to Shomen. An opponent walks forward
and starts to take Kirioroshi from Jodan no Kamae. Draw the sword and
cut upward aiming for the opponent’s left or both wrists. As the
opponent steps backwards, pursue him taking a positive Kirioroshi.
POSITION
Whilst sitting in Seiza facing off Shomen (15 to
30 degrees) as in (A). An opponent walks toward you and starts to attack.
As in diagram (B), the angle from Shomen does not
have to be 15 degrees. Up to 90 degrees is acceptable. |
MOVEMENT
a) Start to draw the sword focusing Metsuke on the standing opponent.
b) Take one step forwards towards Shomen with the right foot and take Nukitsuke
aiming at the opponent’s wrist(s).
c) On Nukitsuke action the left foot is just off the ground (floor).
d) The edge travels from left to right to cut the opponent’s wrist which
is in the Jodan position.
e) At this moment, Metsuke is upon the opponent’s eyes. Not on the Kissaki
or the target.
f) Next , bring the left foot to the level of the right one. Bring the sword
up into Jodan to take a large Kirioroshi to the opponent’s Shomen, stepping
forward with the right foot.
g) Attack with the left hand on the left hip. Swing the sword right forward
and bring the fist to a position just off the right temple.
Next take a large Chiburui bringing the left foot to meet the right at the
same time.
h) Pull the right foot one step backward and do Noto which is completed in
a standing position.
EXPLANATION OF MAJOR POINTS
NUKITSUKE
1, When the opponent tries to attack from the Morote Jodan posture, take one
step forward with the right foot towards Shomen and draw the sword out as in
Nukitsuke, aiming for the opponent’s wrist(s) with the left knee slightly
raised. The sword is drawn from a low position to the upper right, an action
similar to Gyaku-kesa-giri (reverse Kesa-giri). With the edge pointing slightly
right upwards.
In a single handed technique a minimum angle between the arm and the blade
must be maintained to produce a positive result. Also an essential hip twisting
action in the opposite direction is made at the same time. Consequently a single
handed cut with the arm and sword on a straight line is quite useless and lacks
power practically and logically. This is because the arm swing is generated
from the weight of the sword. If a single handed cut is inevitable, it is far
better to cut diagonally.
In case where a standing opponent attacks a sitting target there is no time
to prepare to take satisfactory counter action under these conditions the left
knee is slightly off the ground.
ATTACKING ACTION WHILST STANDING
Stand up with Kiritsuke action and aim at the standing opponent’s Kote
(wrist) with the right foot forward. Bring the left foot to the right at the
same time Jodan Kamae is taken up. Then make another double handed Kirioroshi
stepping forward again with the right foot. The timing between Nukitsuke and
Kiritsuke is neither fast or slow. Nukitsuke with Kiritsuke catches the opponent’s
Kote. As he hesitates with the injuries incurred, one pursues and finishes with
a large Kirioroshi. Therefore it is not necessary to take a hurried Kirioroshi.
Cut dynamically will full Tanden power. If this action is too fast it will finish
looking like the Kendo method of Ki, Ken, Tai, Ichi. In Kendo the Ken (swordwork)
and Tai (body and footwork) must meet together. However in Iaido the upper body,
hips, waist and foot position must be positively prepared before taking cutting
action.
Prepare a good foundation, ready the lower half of the body, then take Kirioroshi
action. This is the Iaido method. A combination of foot, hips, hand technique
is Kendo method.
NOTO
In Tsukikage, Noto action is taken from a standing position. However the feel
must be the same as that of a kneeling Noto. A display of strong Zanshin and
pride is a requisite. Also in any form of Noto the hips must neither rise or
fall during action. The hips must be held horizontal until Noto action is complete.
 |
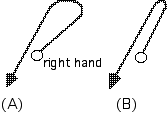
The right hand (fist) movement in Noto should look like diagram (B)
Inscribing a big loop when the Kissaki meets the Koikuchi will result
in a loss of Zanshin power.
Sayabiki (pulling back the Saya) with the left hand in Noto and Nukitsuke
is also a very important point. |
Not only Sayabiki but also left hand control in pushing the Saya down is important
in making a smooth Noto.
 |
JUPPON-ME & JUIPPON-ME |
HOME |
|

